
Creating a Roadmap - A Tutorial
Want to know more about the features and benefits of the Roadmap Maker app? Then you’ve landed at the right location. In the illustrations below, we will walk you through the process of creating a Roadmap, adding products to your roadmap and annotating your products.
If you want to follow along with this tutorial, then you will need to either purchase the application or have a subscription. If you have neither, that is OK too. You can always use the information below to help you make a buy / subscription decision.
The application supports adding an “Example Roadmap” without any purchase or subscription so that you can at least play around with the app to see if you like it. If you want to use the “Example Roadmap” to help you with your purchase / subscription decision, then we would recommend popping over to the User Manual section of this website to understand all the benefits of the app. The User Manual also describes, in a lot more detail, all the features and benefits of the app. we hope you like it!
Step 1: Creating Your First Roadmap
- Open the app and navigate to the “Roadmap” Tab which is the first one on the left.
- Click on the “+” button located towards the upper left of the screen to add a new Roadmap.
- Enter any name for your roadmap. You must also provide a description for your roadmap. you can leave the remaining properties as they are defaulted.
- Click on the “Save” button to save your new Roadmap.
- Make sure your Roadmap is selected, by clicking on it in the list.
- Finally, to take a peek at how it looks, tap on the “PDFMaker” tab and you should see something that looks like the illustration below.
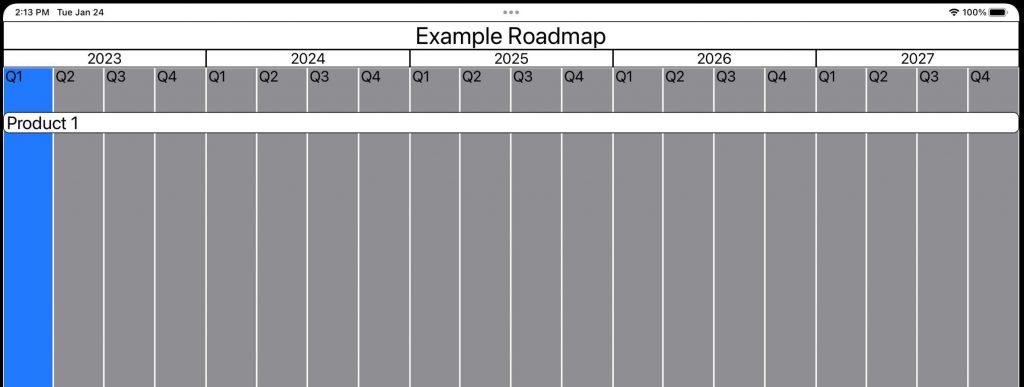
Blank Roadmap
Above, you can see the title of your Roadmap as well as an automatically constructed date range which will become the background for all your products. This background area is automatically generated based upon the date range of your roadmap – in this case 5 years – and the date intervals that you have selected. For a 5 year roadmap, the application defaults to “Year” as the first interval as can be seen in the first row beneath your Roadmap title with the labels “2023”, “2024”…”2027.” In the next row, the second date interval is used to produce vertical columns based upon with width of the second date interval. For a 5 year roadmap, the default is “Quarter.” Finally, you may be asking why one column is blue? Well, the application automatically highlights the roadmap in this way based upon the date that you are viewing the roadmap. Since this tutorial was created in January, Q1 has automatically been highlighted. If you were to open this roadmap 3 months from now, the blue area would then automatically move from “Q1” to “Q2!” Don’t worry if you aren’t a fan of blue, you can change the color as well as all the colors of the roadmap.
Step 2: Add a Product to Your Roadmap
- Tap on the “Construction” Tab.
- Near the upper left of the screen, tap on the “+” button to add your first product.
- Give your product a name and you can leave the rest of the properties as they are defaulted. In this tutorial, we chose the title “Product 1.”
- Once added, you can tap on your new product to see the construction area.
- We won’t be doing any constructing during this step, but you can see how your Roadmap looks, buy tapping on the “PDFMaker” Tab again. It should look something like the illustration below.
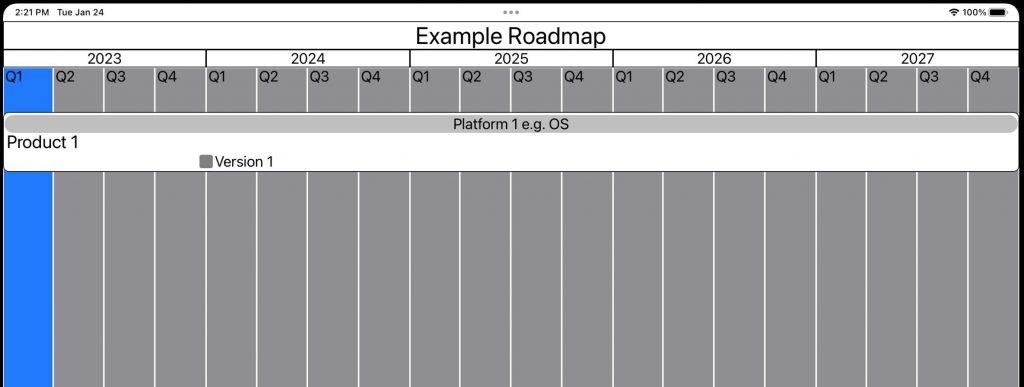
Roadmap with a Single "Blank" Product
In the above illustration, since we did not change the date range of the product, it starts and ends with the same date range as defined for the roadmap. At the moment, we can only see the product title as we have not added any annotations to the product yet. Notice the height of the product. It is only as tall as required to display the product title. As you will see, all products will automatically adjust their height to accommodate the annotations that you add.
Step 3: Lets Add Some Dates to Your Roadmap
- Tap back on the “Construction” Tab.
- Next, since all annotations need a date to call home, we will add some DATE annotations to our Roadmap.
- Scroll to 1Jan2024 and in the area labeled “Dates” at the top of the screen, double-tap as close as. you can to 1Jan2024
- As in the illustration below, you will notice that you now have a DATE annotation added to your roadmap.
- Does your date say “1Jan2024?” Mine didn’t either. No worries, all you have to do is to drag and drop the DATE to a new calendar date. While you drag the annotation, you will see in much bigger text, the current date. When you get to “1Jan24” drop it.
- Now, repeat the process by adding a new DATE annotation to “1Jan25” – one year later.
Date Object Added
The cool thing about Date annotations is that your other annotations will “snap” to the closest date when you add them. Then, they will be “stuck” to them so that if you drag the Date annotation to a different calendar date, all other annotations associated with your Date will automatically move too. This is one of the best features of the Roadmap Maker App. Since project dates are not set in stone, if one changes, you can update your entire Roadmap by dragging a single Date annotation!
Step 4: Product Annotations
- Now that you have 2 Date objects for your roadmap, you’re ready to add some other goodies to your product.
- Let’s add 1 Versions and 1 Platform to your product.
- Depending on the resolution of your device, you may need to scroll down to see the Version construction area (row). Once you have located it, simply double-tap in the row as close to 1Jan24 as you can.
- Don’t worry, you don’t have to be that close because once it is added it will automatically “snap” to the closest Date annotation.
- If it snaps to the wrong date, simply drag it close to 1Jan24 and it will re-snap.
- Next, find the row called “Platform Row 1.” This will be located at the top of the construction area.
- The app supports 3 rows of Platforms, for this step, we are going to add a Platform to the 1st row.
- Now, double-tap between the 2 Date annotations on the “Platform Row 1” row.
- Your Platform should be added and automatically “snap” to both Dates so that it spans the entire year between 1Jan24 and 1Jan25.
- Finally, head on over to the “PDFMaker” Tab to take a look at your Roadmap.
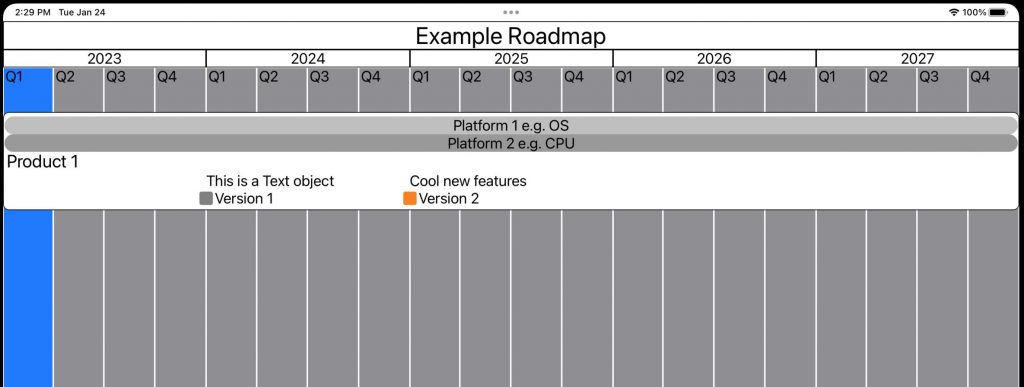
2 Version and 2 Text Annotations
If you followed the instructions above, your Roadmap will not look exactly like the one above (yet). Notice that the Platform annotation above spans the entire date range of the product. If you want to make your Platform look like the one above, head on back to the Construction Tab and follow these instructions:
- Find and single-tap on your Platform to selected it.
- You will notice a popup menu with several options. All these options are described in detail in the User Manual.
- For now, click on the purple icon which has 2 arrows and a hyphen “<->”
- Another menu will popup with 2 date pickers.
- From here you can pick the starting and ending date for your Platform.
- Select “1Jan2023” and “1Jan28” respectively for starting and ending dates.
All objects support properties which you can access in the same way as described above for the Platform. Simply single-tap to select, then adjust the desired properties.
Platforms are used to illustrate some foundational components that are used in your product, like OS, CPU, third party component, etc.
Versions are used to illustrate the date and version of your product releases. Versions also support a property called “Details” which supports a multi-line text editor in which you can place as much detail about the version as you wish. Details are not drawn directly on the Roadmap, instead, when displaying your Roadmap, you can click on a Version annotation to display and edit your Version details.
Step 5: Adding more Annotations
Now you are going to add the following:
- 1 more Version to 1Jan25 with text = “Version 2.”
- 2 Text objects – 1 to 1Jan24 and 1 to 1Jan25 with the texts “This is a Text object” and “Cool new features.”
- Add some text to our existing Platform called “Platform 1 e.g. OS.”
- Add 1 more Platform underneath the existing Platform with text = “Platform 2 e.g. CPU.”
Please see step #4 above if you needs some help as well as the Hints below:
Hints:
- Single tap an annotation to select it.
- Use the Circle and Square icon to change Symbol properties, like color, size and the symbol.
- Use the Text and Bar icon to change Text properties, like text, text size and color.
- Single tap anywhere NOT on an annotation to remove the popup menus.
- When you add the other Platform, double-tap in row 2 to add it below the existing one.
- If you get totally messed up, don’t worry, you can always select an annotation, then the “Trash Can” icon to delete it and start over.
- Finally, if your annotation doesn’t end up where you like it, you can drag it to a different Date location or use the “<->” icon to select the dates.
When you are done, and you head over to the PDFMaker Tab, your Roadmap should look like the one below.
More Annotations Added
Step 6: Arrow and Blocker Annotations
By now, you have been introduced to the following Annotations:
- Platform
- Version
- Text
Now, we are going to introduce you to 2 more – the Arrow and Blocker. Sometimes, these 2 annotations are used together to illustrate an important date range which becomes more important as you near the arrowhead. Then, a Blocker is used at the same place as the arrowhead to illustrate a deadline. For example, an Arrow can be used during a period where a last time buy of some component is in place and the Blocker can be used to highlight when stock runs out. In fact that is what we are going to do next:
- First, we are going to add another Date annotation for 1Jan26 (See step 3 for a reminder)
- Next, find the Arrow row and double-tap on it between the Dates of 1Jan25 and the new Date of 1Jan26.
- Next single-tap the Arrow and use the text properties icon to change the text to “Last Time Buy “widget”
- Finally, double-tap the Blocker construction row close to the Date of 1Jan26, then change the text to “Out of Stock “widget”
If you pop on over to the PDFMaker Tab, your Roadmap should like like the illustration below. If not, you can go back to the Construction Tab and make any adjustments.

Arrow and Blocker Annotations
Step 7: Adding More Products
Now, that you are getting the hang of product construction, we are going to add 2 more products and their annotations. Please refer to the illustration below to help guide your way.
- Depending on the resolution of your device, you may need to scroll to the right in order to see Product 2 and / or Product 3 as these Products do not start on the start date of the Roadmap.
- Back on the Construction Tab, add another product called “Product 2.” Before tapping on the “Save” button make sure you have changed the following properties:
- Start Date = 1Jan24
- End Date = 1Jan26
- Ending Color to “Yellow”
- If you got too antsy and already tapped on “Save”, you can always select your Product from the list, then tap on “Edit” to adjust its properties.
- Now, add another Product called “Product 3.” with the following properties:
- Start Date = 1Jan26
- End Date = Product End Date -> 1Jan28
- Both the staring and ending color should be “Yellow”
- Next, add the annotations that you can see on the illustration below to each Product. Please see the Hints below:
Hints:
- We are adding 2 Platforms on the same row, but between 2 different set of Dates. Make sure that you are double-tapping between the appropriate set of dates (1Jan24 <-> 1Jan25, and 1Jan25 <-> 1Jan26
- We have a version which is placed at the very start of Product 2. Simply double-tap to create this version close to the edge of Product 2. If it “snaps” to a date, simply drag it close to the edge and it should snap to the beginning of the product

2 New Products and Their Annotations
Here, we are using color to represent the situation where one product is ending and another product is its replacement. Product 2 starts with a white color and ends with a yellow color. Then Product 3 is completely yellow. In this way, you can use color for product transitions.
You have now been introduced to all Product Annotations except the Highlight and the Paragraph. Highlights behave like Arrows and Platforms in that they need 2 Date objects for them to “snap” to. In addition, Highlights support transparency since they cover the complete Product vertically to highlight an important area / date range of the Product.
Paragraph annotations are just like Text annotations, except that Paragraphs support multiple lines of text. They are typically used to describe the major features of a Version annotation.
You may notice the toolbar at the top, middle of the screen. This toolbar is used to change the text size and symbol size for all Annotations of the selected Product. Depending on the number of Products and Annotations you are using, you may want to decrease the size of your text and / or symbols which will automatically decrease the height necessary to display your Product. No sense in adjusting the size for each and every Annotation individually, simply use this toolbar to make the job easier.
Step 8: Final Features
By now, you should be comfortable with Product construction. If not, you can take some time to restart this tutorial or play around if you want to.
In this section, we are going to discuss the following app features:
- Using the View Tab
- Making PDF’s
- Using the Settings Tab
View Tab
Up to this point, we have a been using the PDFMaker Tab to display our Roadmaps. The PDFMaker Tab will automatically scale your roadmap horizontally to try to fit the entire date range on the screen of your device. Depending on your date range, this may not be the best way to review your Roadmap. Also, the PDFMaker Tab does not have anyway to switch between Roadmaps when you have more than 1 that you are planning to review.
Enter the View Tab. On this tap, you can:
- Select the desired Roadmap to review.
- Scroll to different areas of the Roadmap (the app supports both horizontal and vertical scrolling, depending on your date range, the number of products and the resolution of your device).
- “Zoom” the roadmap horizontally by adjusting the day width with the toolbar along the top right of the screen.
Everything on this Tab should be pretty self-evident except how the toolbar works..Depending on the date range of your Roadmap, the application will use a number of screen pixels to represent a single calendar day. With a date range of > 1 year, the application will, by default, use 1 screen pixel for 1 calendar day. In this tutorial, our 5 year roadmap is 1,826 days and thus pixels wide (if you try to do the math and think the width would be 1,825, you have forgotten that there is a leap year in 2024 – yes the app is smart enough to know this) . However, you can extend or shrink the display of your Roadmap by adjusting the number of pixels used for each calendar day. The toolbar on this Tab will increase or decrease the day width (number of pixels used for 1 calendar day). As an example, if you switch from 1 pixel to 2 pixels in our tutorial by tapping the “>” button, your roadmap will now be twice as wide as before. This may seem unnecessary in the case of our tutorial, but if you create a roadmap with a date range of just a couple of months, you will see the need to have this option. Also, if you are having some difficulty getting your Date Annotations to the exact day you prefer, you can temporarily increase the day width to make the calendar date selection less persnickety.
In addition, if you tap on a Version, its details will be displayed. Here you can review the details and make any edits that you desire.
PDFMaker Tab
We have already visited the PDFMaker Tab in this tutorial; However, there is one additional feature supported on this Tab. By double-clicking anywhere on the screen, you can create a PDF of your Roadmap. The PDF will be created and stored in the Files app of. your device. Please note that each time you make a PDF of your Roadmap, it will over write any existing PDFs for the same Roadmap. At this point in time, the app does not support multiple PDFs of the same Roadmap
Settings Tab
The Settings Tab offers the following features:
- Purchase / Subscription options
- Add the User Manual as a Tab to the application. The User Manual has a lot more details
- Restart the app so that the on-boarding intro screens can be seen again
- Add the Example Roadmap to the list of Roadmaps in the App
- Change the color theme for the application – selecting this option will restart the application; However, you will not lose any of the work that you have done on any of your Roadmaps.
- Set default properties for the Roadmap, Products and Annotations for the Application – Using defaults can really increase your efficiency in creating your Roadmaps. If you find that you are always changing a particular text size, symbol size or color, jump over the Settings Tab and set a default for this property
- Link to this website for support.